Breaking-in a Glow Plug Engine
The process of breaking-in (aka running-in) your new rc glow plug engine is very important if you want the engine to have a long and healthy life.
Incidentally, the term 'breaking-in' means to run the engine gently for short periods of time, to let various internal parts and surfaces 'bed in' together.
But before we go any further, let me just say that following your engine manufacturer's instructions for proper break-in procedure has to be your first choice. If you don't have those instructions to hand, then this article is for you.
It's also important to note at this point that this page refers to a standard ringed glow engine, not the ABC type which requires a different break-in procedure.
An rc glow plug engine break-in doesn't take long to do and a properly broken in engine will run smoother and give you better performance.
 Most IC (internal combustion) powered rc trainer airplanes take a 40 or 46 size glow plug engine that runs on a special blend of rc glow fuel, the ingredients of which are oil (either Castor, synthetic or a mix of both), methanol and nitromethane.
These three ingredients of glow fuel each have their own roles to play; the oil lubricates the moving parts inside the engine, the methanol provides the main source of ignition and the nitromethane aids to continue the burn on the low presence of oxygen inside the combustion chamber. Nitromethane also adds power and also helps to keep engine parts clean.
Despite glow fuel being commonly referred to as nitro fuel, nitromethane is actually the least important of the three ingredients.
Using the correct grade of glow fuel for your engine is important - common grades range from 5% to 20% nitromethane content, with other mixes being available for specialised use.
Your engine manufacturer's recommendations should be adhered to when choosing fuel, particularly for the breaking-in period.
Breaking-in the Engine on the Ground
When breaking-in your glow plug engine you have two choices; you can either break it in on the ground or in the air.
If you've bought an RTF trainer with engine and fuel tank already installed, the obvious thing to do is to leave it all in the plane. But if you're building a kit and haven't yet installed the engine in your plane, then you have the option of breaking-in the engine on a bench stand or installing it in the plane and then breaking it in.
The bench stand option is the better one, the engine is easier to work with because it's not surrounded by model. Also, you'll be running the engine on a rich mixture which produces more oily gunge from the exhaust - better to make this mess away from your shiny new airplane!
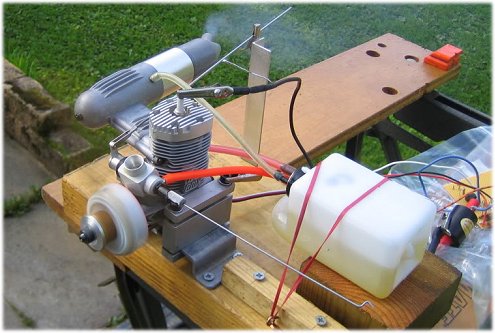
A bench set-up must be strong and secure with the engine fixed properly (i.e. use the four engine mounting holes with correct fixings). Don't be tempted to use clamps or any other method to fix the engine to the bench. A good set-up can be seen below (image © modelflying.co.uk)...

Above: breaking-in an RC glow plug engine
on the bench is a better option.
Obviously if your engine isn't all nicely set up in the plane and is on a bench, then you need to sort out a safe throttle linkage.
You can either put together a simple receiver and servo set-up, so the engine is being controlled as it would be in the plane, or you can make some kind of torque rod to throttle linkage arrangement so you can manually adjust the throttle safely from behind the engine. This can be a length of wire running from the throttle linkage to behind the engine, i.e. a manually operated servo linkage, without the servo!
If you can't or don't want to do a bench run, breaking-in your glow plug engine in the plane isn't the end of the world by any means, and I've done it often enough.
There's no need to attach the wing, of course, and you can probably rig up some kind of temporary shield to steer the oily smoke away from the fuselage if needs be. But if you do the break-in with the engine in the plane, make sure that the plane is properly restrained and secure and cannot move while the engine is running. Think safety at all times!
Breaking-in the Engine in the Air
Breaking-in a glow plug engine in the air is the other choice, and I've done this too. Needless to say, you should only attempt this if you've got some flying experience and can confidently fly solo.
The advantage with doing the break-in during flight is that the engine has a much better airflow over it, so cooling is more effective, and this is obviously better for the engine.
The disadvantage is that you can't use the throttle too wildly, so you won't have much available power to hand and you'll need to fly in a 'restrained' manner for a while.
Breaking In Your Glow Plug Engine
The reason you have to break-in your new glow plug engine is to 'mate' the moving parts together and eliminate any roughness between surfaces.
This beds everything in nicely; smoother surfaces mean less friction, and less friction means better performance and a longer life.
For this reason, during the break-in period the engine should be run on a richer mixture, meaning more fuel than normal is let into the engine. This ensures a higher level of oil into the engine to give better lubrication.
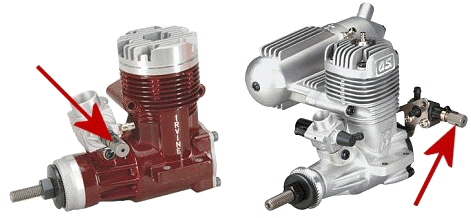
The mixture setting is controlled by the 'high end' needle valve on the right side of the engine (when viewed from the front) - screwing it in (clockwise) leans out the mixture (less fuel) and unscrewing it (counter-clockwise) richens the mixture.

Above: the location of the all important needle valve. Modern engines may have the valve at the rear (right), but many engines have the needle on the carburettor (left).
As a very general rule of thumb, the mixture is slightly rich if the needle valve is unscrewed 3 1/2 to 4 turns from being fully screwed in (i.e. closed). Again, this is only a vague indication and the engine manufacturer's instructions should be followed as your first and foremost guide, because this setting will differ from engine to engine.
Breaking-in your glow plug engine should be done over a few tanks of fuel (taking, say, an 8oz/250ml tank for example) - but not all in one go! It's important to give the engine lots of rest, particularly during the first tank, and especially if you are breaking the engine in on the ground where the cooling is more restricted. As you progress through the subsequent runs, you can let the engine run longer.
With the engine running, keep it at about 1/4 or 1/3 throttle with occasional 'blips' to over half throttle, and also fluctuate the revs between idle and half throttle. Never go full throttle during the break-in period, it doesn't do the engine any good at all.
After a few minutes running, close down the engine and let it cool down for maybe 10 minutes or so.
Each time you start a new run, let it run for a few minutes longer than the previous time.
As the engine breaks-in you will notice the revs increase and become smoother at the higher throttle settings. This is because the internal parts are getting bedded in and so the engine is starting to run smoother.
But you need to keep the mixture rich to keep up the lubrication, so unscrew the needle valve a small amount more, say one quarter turn or so, and try to keep the engine sounding a bit 'lumpier' than it should be, indicating a rich mixture. The amount of blue(ish) smoke coming from the exhaust is another good sign that oil is being burned.
Repeat this kind of run over a few tanks of fuel, and your glow plug engine will be nicely broken-in and ready for action.
Once the engine is broken-in, it should run smoothly with the needle valve set at around 2 1/2 turns out from fully closed. But, again, this is only a general rule of thumb and the actual needle valve setting will vary from engine to engine, and indeed from session to session on the same engine.
The Pinch Test
Once broken-in it's important to get the needle valve set right and, again, the manufacturer guidelines for your particular engine should be your primary reference.
But there is a very simple test you can perform - the 'pinch test'- to get the needle valve setting approximately correct.
With the engine running at full throttle, very quickly pinch the fuel supply (to carb) line between your thumb and index finger. Only pinch the line for a second, then release it. If the engine dies, or stutters badly, then the mixture is too lean and you need to unscrew the needle valve slightly to richen the mixture.
If you pinch the fuel line and the engine RPM increases slightly, it's running too rich and so you need to close the needle valve a bit. Every time you change the needle valve, repeat the pinch test.
When the mixture is set correctly engine RPM will increase very slightly when you pinch the fuel line, then drop off again when you release it. This is what you're looking to achieve.
Why the pinch test works: if your glow plug engine is running too rich, pinching the fuel line starves the engine of fuel for a second and so in the moment that you're pinching the line the lack of fuel equates to a leaner mixture going in to the engine; a rich-running engine will suddenly perk up as the fuel leans out during the pinch.
Conversely if the mixture is already too lean, when you pinch the fuel line you're practically starving the engine completely and so it will die.
It's important to remember that the needle valve setting can always vary from flying session to flying session and even from flight to flight.
Ambient air temperature and pressure can all play a part on the mixture setting, and also the mixture leans itself out as the fuel level in the tank gets lower - as it drops so the pressure on the fuel being pushed through the line drops and this naturally weakens the supply into the carb.
Break-in Tips
Here are a few pointers to bear in mind...
- Don't rush this very important process, impatience will cost you in the long run!
- Always adhere to the manufacturer instructions for your engine, including choice of fuel and glow plug as well as break-in procedure.
- Also pay close attention to manufacturer recommendations for propeller size during break-in.
- Go easy on the throttle - keep it between idle and halfway, only occasionally blip it fully open.
- New engines rarely run well (from my experience...) - expect lots of cutting out to begin with.
- Be aware of noise - glow plug engines have a high 'nuisance' factor, so if you're breaking-in your engine in the garden, try and do it when your neighbours are out!
- Be very aware that the engine will be extremely hot, and will burn skin!
- Respect the breaking-in of your glow plug engine as a serious and important process.
- Last but far from least... Be safe! Model airplane engines can bite, and bite hard. Always respect your engine and mitigate any risks.
