RC Airplane World Flight School
- Lesson #8 : Flying your RC Plane
Following on from lesson 7, this flight school page will get you flying your rc plane gently around the sky, and getting used to how it responds to your stick inputs.
Incidentally, an rc flight simulator is an invaluable aid when learning how to fly an rc airplane, and I strongly recommend having one. There's a link to my flight sims article at the end of this page.
Stay Cool!
The first thing you might notice when flying your rc plane is that you're nervous, your heart is thumping and your hands feel shaky - this is completely normal!
I've been flying radio control planes for a few decades now and I still get the shakes now and again. It's all part of the fun and exhilaration of the hobby, but I'm not sure of the precise explanation; I guess it's the fear of crashing that causes the adrenalin rush inside!
The important thing is to not let your pounding heart and shaking hands get the better of you, Stay calm, relaxed and focused on the job in hand - flying your rc plane!
Take Things Slowly
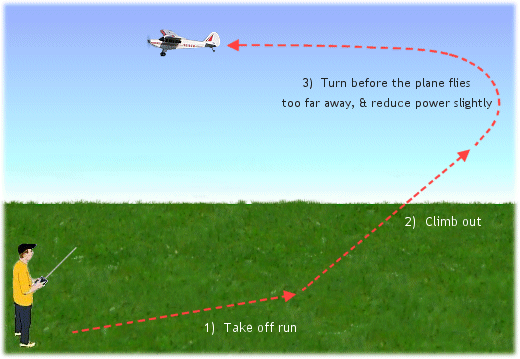
Once you've taken off or hand launched your plane (lesson #7, in case you missed it!), climb out to a safe height. But before the plane gets too far away you need to turn it one way or the other.
Which direction you turn depends largely on where you're flying, but you need to turn it towards open space and well away from any obstacles (trees, posts, pylons...).
To make a turn during the climb-out, smoothly apply rudder (or ailerons) in the direction you want to turn. At the same time, reduce power to somewhere around three-quarters power; once you've taken off and gained height there's no need to keep the motor going flat out, the plane doesn't need this amount of power for general flying.
That said, the amount of power you need to apply is going to depend on the airplane that you have as well as flying conditions (i.e. wind) for that day.
The badly scaled picture below shows approximately what you need to do...

Above: climb out steadily and turn before the plane gets too far away.
Keep the climbing turn gentle. As you apply rudder (or ailerons) also apply a small amount of up elevator; this prevents any altitude loss during the turn, and with ailerons is essential to pull the plane round (bank) in the turn.
After climbing out, don't fly too high, because your plane will be too small to see properly and you might become disoriented with what it's doing. You need to retain a very clear view of your plane at all times, so don't let it become a small dot in the distance.
 It's very hard to judge distances of any kind, so telling you to fly at around 100 feet high might not mean much as you're reading this page, but 100' or so is a very safe altitude to be at.
If you think of a mature oak or maple tree, for example, or 6-storey apartment block, treat the height of those as the kind of height to be flying at.
This little picture gives a fair comparison between you (bottom left) and a safe height (apartment block roof) to fly at.
When you've turned enough to get the plane flying straight and level and back past you, try another turn but this time in the opposite direction to the one you've just done.
Keep turning and straightening, turning and straightening in all directions and just fly the plane around the sky, all the time getting used to how the plane responds to your stick movements.
You'll very quickly get an idea of how much stick input you need to make to get the plane to do what you want it to.
Keep the stick movements small and smooth all the time - moving the sticks too much is a big cause for crashing in the early days of learning to fly an rc plane.
At the same time, concentrate on not losing any altitude during the turns. The aforementioned use of elevator is critical for maintaining altitude while turning, and this will soon become second nature as you gain the coordination needed.
Below is a short video of the kind of turning you should be doing, to get used to the controls...
Remember, always use rudder and elevator, or ailerons and elevator, together when you make a turn.
If you're learning on a 4-channel plane, don't worry about using rudder for now, just use ailerons and elevator to turn. Use of rudder in the air will come with time.
Flying a Circuit (Pattern)
Once you're used to how the plane responds to your stick movements, and you're comfortable and confident with turning it in both directions, you can practice the essential circuit flying.
This is when you fly a large rectangular pattern in the sky. I call it circuit flying because that's what it's called here in the UK, as opposed to the US term pattern flying.
It will take lots of practice to get it tidy, but it's worth taking the time to do it because it's this pattern you should fly when landing.
Get used to flying the circuit in both directions, and fly it at different heights too.

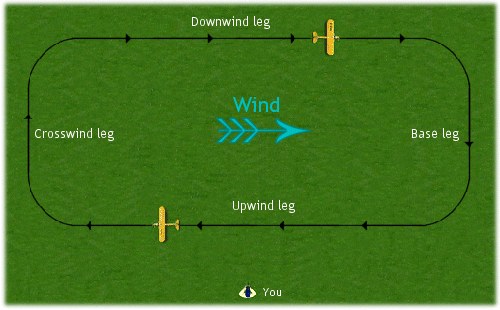
Above: practice this circuit pattern in both directions.
A complete circuit pattern consists of four parts:
- The upwind leg, where you fly your plane in to wind before turning on to...
- the crosswind leg, where you fly perpendicular to the wind, then turn on to...
- the downwind leg, where you fly with the wind before turning on to...
- the base leg, which is the last side of the pattern, opposite the crosswind leg.
The pattern is repeated over and over, so after flying your rc plane on the base leg you simply turn and fly another upwind leg etc.
When it's time to land your rc plane, then the base leg is followed by your final approach and landing.
Trimming your RC Plane
'Trimming' is the term used to describe the action of fine-tuning the plane so that it flies straight and level on its own, with the transmitter sticks in their neutral positions.
Advanced permanent trimming might involve adjustments to motor thrust angles and Centre of Gravity location, for example, but in the early days of your new hobby you can trim your rc plane in-flight using the transmitter trims.
 While flying your rc airplane around the sky you may find that it has a tendency to turn one way or another when you aren't steering it, or that it wants to climb or dive without you making it.
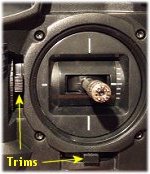
Use the appropriate trims on the transmitter to fine-tune the control surfaces during flight, to try and iron out these unwanted tendencies. For example, if the plane wants to turn to the left, apply a small amount of right rudder trim. If your plane has ailerons and it wants to roll to the left all the time, apply some right aileron trim. You get the idea...
After you move a trim, let the airplane fly on its own for a few seconds in a straight line and then re-adjust the trim as you need to.
The aim is to get the plane flying straight and level with the transmitter sticks centered, and no input from you.
If you don't bother to trim your airplane then you'll be working unnecessarily hard to control the plane, so take the time to trim it correctly.
As you become more experienced and familiar with how rc airplanes operate, you'll be able to make more permanent trims if necessary, like changing the thrust angle of the motor or slightly adjusting the Centre of Gravity.
But even with these adjustments done it's still perfectly normal to have to use the transmitter trims now and again. Outside influences can alter the way a plane flies, no matter how well trimmed it is in the workshop.
Read more about advanced rc airplane trimming methods.
Important points to remember when flying your rc airplane:
- Don't fly too far away from you. If you do, you can very easily lose sight of your airplane - not completely, but enough to not know exactly what it's doing, which way up it is etc.
This is the quickest way of becoming disoriented with the plane. When this happens there's a good chance of losing control and crashing. - Similarly, never fly your rc airplane directly over your head. This will also disorient you as you look directly upwards while turning your head to follow the plane. You'll lose all reference to the ground and the plane in relation to it. Always keep the plane in front of you and to the sides - never overhead or behind you.
- Never fly across the sun, even if you're wearing sunglasses or if there is hazy cloud. Instant temporary blindness will follow, with potentially disastrous results.
- Remember that when flying your rc airplane towards you, the turns are reversed; left becomes right and right becomes left. This is going to catch you out in your early days of flying but with practice you will get used to this 'reverse control' or 'reverse co-ordination' as it's also called.
Tip: if you get disoriented when the airplane is flying towards you and turning, move the stick to the side of the lowest wing as you see it. For example, if the plane is coming towards you and turning to its right, the right hand wing will be lower than the left. Move the stick to that lower side as you see it, and that will correct the turn. - Always keep flying your rc plane in open space, well away from people, animals and property.
- Also fly well clear of trees - they have a very magnetic effect on model planes!
- Don't fly too low - the closer you are to the ground, the less time you have to recover from bad situations. Fly at least "2 mistakes high"!
- Keep all your turns gentle and don't over-correct. The majority of rc airplane crashes for beginners are caused by over correction i.e. too much movement of the transmitter sticks. Keep things slow and steady all the time!
- Common sense must prevail - in other words, don't do anything beyond your current capabilities.
When Flying your RC Plane Goes Wrong
If you're being as sensible as you should be and flying gently and slowly, just getting used to turning your plane and normal flying, there's no reason why anything should go drastically wrong.
But if you do suddenly find yourself in trouble, don't panic!
Panicking usually only makes the situation worse, and you need to try and keep cool but at the same time react quickly.
The first thing to do is cut the motor power. This is immediately going to decrease the airspeed of your plane (so long as it's not in a vertical dive) and hence decrease likely damage if the plane decides to impact anything.
If the plane is in a dive, and the right way up, apply up elevator. This is going to pull the plane out of a dive and give you time to recover. Once the plane has recovered to a normal attitude, add motor power and calmly return the plane to straight and level flight.
If, somehow, your plane has got in to an inverted (upside down) dive, you need to apply down elevator to pull out of it.
If in doubt of your airplane's situation, just keep cool, cut the motor and centralise all control surfaces. Just by doing this alone gives you a couple of seconds to get your head together and assess the situation as your plane returns to a better flight path, albeit in a direction you probably don't want!
The bottom line with flying your rc airplane for the first few times is to just stay cool and be sensible. Don't try any crazy stunts at this early stage. Keep things simple, and you'll be fine!
Get an RC Flight Simulator!
If you're even half-serious about your new hobby, then a good flight sim is one of the best things you can invest in. They're incredibly realistic these days, and quite affordable really.
An rc flight simulator really does teach you the hand-eye coordination and reactions that you need when flying an rc airplane.
![]() Next up: Lesson 9 - Landing your rc airplane - yikes!
Next up: Lesson 9 - Landing your rc airplane - yikes!
Or skip to the lesson appropriate to your current situation...
- Lesson 1: Buying your rc airplane
- Lesson 2: Know your rc airplane
- Lesson 3: Preparing your plane
- Lesson 4: Weight and balance
- Lesson 5: Where to fly your plane
- Lesson 6: Pre-flight checks
- Lesson 7: Take off / hand launch
- Lesson 9: Landing your rc airplane
All the above Flight School topics are covered in more detail in my Beginner's Guide To Flying RC Airplanes ebook.
