RC Airplane World Flight School
- Lesson #9 : Landing your Plane
Following on from lesson 8, this rc flight school page will teach you how to pull off that greaser of a landing - hopefully!
Whereas taking off is a relatively easy part of a flight, landing your plane is without doubt the hardest and most nerve-racking part, particularly when you're just learning to fly radio control airplanes.
But what goes up must come down, so they say, and learning to land your rc plane consistently safely and well is something you must persevere at.
The other thing they say is that 'practice makes perfect', but as my drum tutor once said "Practice makes permanence." In other words, practice something perfectly and you'll get it perfect, but practice something badly and you'll get it bad!
So do try and get in to the habit of practising landings well, rather than the all-too-common "Well, it's on the ground, that'll do me..." line of thinking!
Your Landing Circuit & Approach
The 'final approach' of your rc airplane is the second-to-last stage of its flight, and setting this approach up nicely is key to a good landing. If you're smooth and steady on final approach, then you're going to pull off that greaser of a landing.
Now there are two ways to skin a cat, apparently, and you have two options when landing...
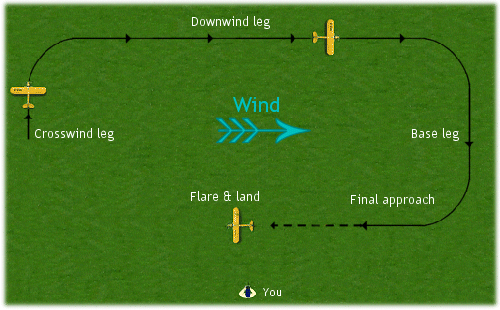
Option One is to fly a proper and complete landing circuit, whereby you fly a crosswind leg, turn on to a downwind leg, then a base leg before turning the plane back in to wind and on to final approach. The image below illustrates this circuit...

Above: The technically correct circuit pattern to fly when landing.
You should recognise this circuit pattern from the flying your rc plane lesson, with just a minor change from upwind leg to final approach, flare and land.
Now, the reality is that most rc pilots choose Option Two, whereby the crosswind leg is ignored and the circuit pattern is commenced on the downwind leg or even on the base leg.
Flying all of, or part of, the downwind leg is preferable because it gives you more time to settle in to things and prepare for landing your rc airplane. And if you advance to flying a plane with retractable undercarriage and flaps, the downwind leg is the time and place to put those features in to operation.
For the purpose of this lesson, we'll focus on the second option of not bothering with the crosswind leg, and we'll join the circuit on the downwind leg, as many rc pilots do.
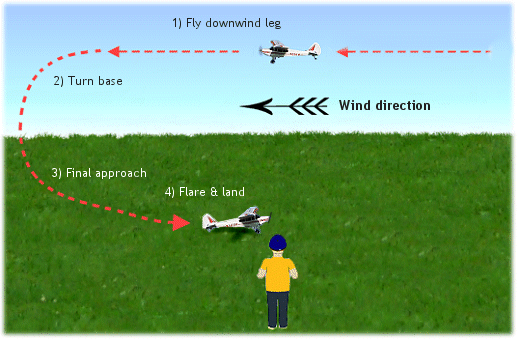
Flying the downwind leg obviously involves flying your airplane with the wind i.e. the same direction as the wind is blowing, before turning the plane through 180 degrees back in to wind for the final approach and landing.
Again, you have two options here; you can either fly the correct base leg as shown in the picture above (a straight leg with a 90 ° turn at each end), or you can fly a continuous, gradual turn all the way round from downwind leg to final approach.
This latter option is a popular one, but it's a good idea to try both ways and see which works best for you. The badly scaled image below shows this rounded base leg option:

Above: flying a continuous base leg turn is a popular option.
The Landing Process
Before you begin your downwind leg, the altitude of your airplane should be constant at, as a very general rule of thumb, 10 metres (30ft.) or so. At least that's what works for me.
There's no hard and fast rule to this height and a lot depends on the type and size of airplane that you're flying. You'll get to know how high to fly the downwind leg with practice and experience.
The important thing is not to be too high, as you'll end up coming in too steep and too fast and you'll probably completely overshoot the landing area. Embarrassing.
So to commence the landing process, fly your airplane downwind until it passes you by up to 50 meters or so (again, this distance is going to depend on a few things) before smoothly turning it through 180 degrees so that it's coming back towards you (remember that reverse control!). Keep the bank angle shallow and, as you turn, slowly reduce motor power at the same time but be ready to increase it again quickly if the plane drops too much, too soon.
Once you've completed the turn, you are now on your final approach. Use rudder to keep the plane in a straight line and use motor power to control its rate of descent. You can use elevator also, but the proper control for rate of descent is in fact motor power. While elevator will certainly make the plane go up and down, it also directly effects the airspeed of the plane and ideally you want to keep this as constant as possible and as slow as possible without stalling.
As the airplane nears the ground, reduce the motor power completely and gently apply a small amount of up elevator to slow the plane's speed and reduce the rate of descent, until the plane touches down.
This very final stage is called the flare and timing the flare is crucial to a good landing - flare too soon and your airplane might stall and crash, flare too late and it will touch down too hard and fast and more than likely bounce all over the place, perhaps even breaking the landing gear or worse.
Flaring your plane at exactly the right moment is something that only comes with practice and experience, and the more landings you do the better you'll get at it as you get to know your plane's flight characteristics.
Below is a short video of how you should set yourself up for a nice landing, with a right to left wind direction...
The Glide Approach
For many rc pilots, turning on to final approach and then just cutting the motor power right back is normal procedure.
There's nothing wrong with gliding your plane in to land, but personally I feel it's better to fly it in using good motor control.
By utilising the motor power correctly, you'll have better control over the airplane's rate of descent and airspeed, and a propeller that's turning slowly under power generally creates more drag than a free-wheeling ('windmilling') prop that just turns as the air flows through it. Depending on the rc airplane that you have, this drag can be used to great effect in slowing the plane down on final approach.
But as with everything in this hobby, just suck it and see. You might find that a glide approach works better for you and your plane than a powered approach does. Or you might just want to do it because it's fun to do!
Missed Approaches
A missed approach is when you've set yourself up for a landing, have it all under control but then at the last minute something goes wrong, or you lose your nerve, and so you open up the motor to full power to climb out and have another go.
There's absolutely no shame in missed approaches, and even veteran and professional rc pilots still need to do them now and again.
It's far better to do five missed approaches and land your airplane safely in one piece, than to rush a landing and bring your airplane home in pieces. But with that said, if you're flying an electric powered rc plane be very aware of time and your battery pack voltage! I have crashed a plane while doing a missed approach, because the low-voltage cutoff (LVC) beat me to getting the plane back on the ground!
And the same goes for an IC powered plane - you might be down to the last drop of fuel and opening the throttle to go around uses that precious drop up, and so the plane goes dead stick on you with no height and no airspeed. Not good.
So regardless of power type, it's always better and safer to land with a bit of reserve juice in the tank.
As I said at the start of this article, landing your rc airplane is without doubt the hardest part of radio control flying, and the part that needs the most practice when you're learning to fly radio control.
But stick at it and learn to land well; don't just accept a bad landing without trying to improve on it the next time. With time, you will be landing without a single bounce!
Just to recap, the previous lessons were...
- Lesson 1: Buying your rc airplane
- Lesson 2: Know your rc airplane
- Lesson 3: Preparing your plane
- Lesson 4: Weight and balance
- Lesson 5: Where to fly your plane
- Lesson 6: Pre-flight checks
- Lesson 7: Take off / hand launch
- Lesson 8: Flying your rc airplane
![]() The Beginner's Guide To Flying RC Airplanes covers every topic you need to know about getting started in this exhilarating hobby, including all the above lessons in greater detail.
The Beginner's Guide To Flying RC Airplanes covers every topic you need to know about getting started in this exhilarating hobby, including all the above lessons in greater detail.
So there you have it - RC Airplane World Flight School for beginners!
Hopefully these little flight lessons have helped you become familiar with and confident about flying your rc airplane. Please continue to use this site, and enjoy your new hobby to the full! ![]()
Safe RC Plane Landing Practice
An rc flight simulator is an excellent training aid and one that I personally recommend. You can read more about them here or use the product links below to click through to Amazon, a great place to buy rc stuff from these days:
Related Pages / Further Training
Pages that are not part of this 'flight school' section of the website but are pages you'll find useful include:
