RC Airplane World flight school
- lesson #3; preparing your RC airplane
Following on from lesson 2, this rc flight school page will get you preparing your RTF rc airplane for flight, including charging and installing the batteries.
Final assembly of your RC plane
As you know by now, this rc airplane flight school is focusing on a typical electric Ready To Fly 'park flyer' type plane, and by this stage you've bought it and spent some time studying the manual and getting familiar with your airplane.
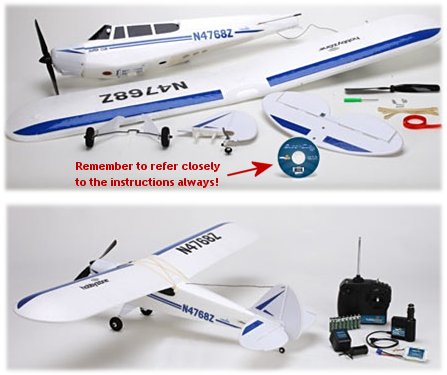
Final assembly of an RTF rc airplane is nothing more than fixing a few pieces into position, notably the wing and, more than likely, the tailplane. You might also need to slot the landing gear into place and possibly fit the propeller and spinner.
This is all easy stuff, and you just need to carefully follow the manual step by step to make sure that it's all done properly. Take your time and triple check everything, cross-reference with the manual a final time when you've finished, and be 100% sure that you've done it all correctly.
Of course, if you've bought an Ultra Micro type rc plane such as the popular HobbyZone Champ then there's really not much for you to do at all, as these planes generally come out the box in one piece!

Above: final assembly of an RTF rc plane doesn't take long,
but make sure you do it right.
Depending on the size of your airplane and where your flying site is in relation to home, you might need to transport the wing unattached and fix it when you get to the field. This is quite normal; have a few practice runs fixing the wing at home so you don't need to refer to the manual when you're at the field.
Another thing you may or may not need to do is attach the propeller. This should also be a simple task, you just need to make sure you put it on the right way (if there are numbers on the prop, these usually face forwards) and make sure to do the securing nut up tightly. But be careful not to over tighten and strip the thread, this would be a disaster!
Transmitter batteries
Brands like HobbyZone and ParkZone include the transmitter batteries in the box, but unfortunately many RTF electric rc airplanes don't come with the transmitter batteries supplied. This means you need to purchase them separately, and if this is the case you have two options...
 The first option is to use good quality disposable alkaline cells (i.e. non-rechargeable). They shouldn't be your local supermarket's home brand cheapies, they should be from a reputable brand (Duracell, Energizer, EverReady, Panasonic...) and new - don't go digging around the bottom drawer of the kitchen cabinet emptying old flashlights!
The reason you need good cells is simple - the signal from the transmitter to the receiver has to be as strong as possible, and this can only happen with good cells in the transmitter. If the signal is weak, your airplane will quickly go out of radio range and you'll lose control.
 Your second option is to use rechargeable cells. They're more expensive than disposable alkaline cells but are cheaper in the long run - good quality NiMH (nickel metal-hydride) cells last for around 1000 charges or so, and one set of rechargeable cells is a darn sight cheaper than 1000 sets of disposables!
Of course, with rechargeable cells you need a suitable charger but good chargers can be bought quite cheaply these days.
If you do opt for rechargeables and need to buy a charger, be very sure that you're buying one appropriate for the cells that you have. If you have any doubt at all, check with the seller.
Ultimately, the type of cell you need is going to be determined by the transmitter you have. Some basic ones only take dry cells, others take NiMHs and/or lithium-based packs. The radio manual will state what you can and cannot use.
Installing the batteries into the transmitter is a straightforward task - pay attention to the polarity and make sure each cell is secure and not loose. When they're all in, place the battery compartment cover in place and make sure that it's secure too.
It's possible that your transmitter can take a soldered pack of rechargeable cells. This is the best option of all and it's worth spending the money on a good quality pack, if your Tx is suitable. Again, the manual will clarify if such a pack can be used.
Motor battery pack
Modern electric rc airplanes almost always get their receiver and servo power from the motor battery pack, via the ESC (electronic speed controller).
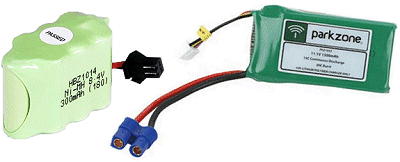
If you've bought an RTF rc airplane the pack will be included and you should have a charger for it in the box also. If a charger didn't come with the plane, you'll need to buy one and, again, be 100% certain that the charger is compatible with the pack. This is especially important for li-po (lithium polymer) motor battery packs which can only be charged with a li-po charger, not one that's only meant for NiCDs or NiMH cells. There's a serious fire risk by using an incompatible charger.

Above: your RTF airplane will have either an NiMH (left) or li-po (right)
motor battery pack - charge them carefully!
Charging the battery pack correctly is of paramount importance if you're to keep the pack in tip-top condition, and you'll need to follow the recommendations for your specific pack very closely. View the battery charging as a serious part of your rc flying, and don't cut corners on the process. Once again, the instruction manual is very much your friend here
Once charged, secure the pack into the airplane exactly as the manual tells you to. In an RTF plane, you probably won't have much choice of where to place it because there will be a specific location or compartment for it to go into.
The pack needs to be very secure because any fore-aft movement of the pack during flight is potentially going to effect the airplane's Centre of Gravity, and this could be bad news. You'll learn more about this in the next lesson...
Checking control surface movement
Setting up your rc plane correctly is crucial to its survival. Getting the control surface movements correct before you go flying is of paramount importance, and yet unbelievably some rc pilots (and not always beginners...) take off their plane with reversed controls (pre-flight checks are covered later), and they wonder why the plane crashes a few seconds after take off.
Check the rc transmitter modes page to make sure your plane is responding correctly to your stick inputs, but here is a general summary of control surface movement in relation to stick movement...
- Elevator stick back = up elevator.
- Elevator stick forward = down elevator.
- Rudder stick left = left rudder (when viewed from above).
- Rudder stick right = right rudder.
- Aileron stick left = left aileron up, right one down.
- Aileron stick right = left aileron down, right one up.
- Throttle stick back = motor completely off.
- Throttle stick forward = motor on.
The amount of deflection of the control surfaces, i.e. how far they move, should be outlined in the instruction manual. Deflection amounts can be adjusted electronically if you have a computer radio (in the 'Travel Adjustment' or 'End Point Adjustment' menu) or manually otherwise.
To adjust manually simply move the linkage to a different hole on either the servo horn or the control horn.
Moving the linkage to an outer hole on the servo horn increases the deflection of the control surface, an inner hole decreases deflection. Conversely, moving to an outer hole on the control horn decreases deflection whilst an inner hole increases it.
Make any necessary adjustments to match the amounts given in the instructions. If you've bought a good RTF and it's been set up well in the factory, you probably won't need to adjust anything - but it's always worth checking.
Setting & checking the failsafe
The failsafe is a vitally important part of setting up your new plane, and referring to your instruction manual is the thing to do here.
Essentially, a failsafe is a function of your radio (only the simplest transmitter won't have one) whereby if the radio link between transmitter and receiver is lost, then the motor and possibly the servos go to pre-set positions. In the case of the motor, it should stop - this prevents a flyaway and reduces potential damage on impact.
Your rc failsafe should be set as per the instructions, and should be tested by powering up the transmitter and airplane, running the motor (with the model safely restrained of course) and then switching off the transmitter. If the failsafe is set correctly, the motor will cut a second or so after the radio link is lost.
For more advanced radios and models, the receiver can be programmed to move the servos to pre-set positions on loss of the radio link - for example deploying flaps and setting the rudder slightly. Again, consult your radio manual for details on this, but these options are unlikely in your first rc plane.
If you're not convinced about the importance of the failsafe, then perhaps knowing that setting the failsafe is a legal requirement in some countries might convince you! For example, in the UK our third party model flying insurance becomes invalid if the failsafe is not set correctly.
Well that should leave you with your rc airplane prepped and ready for action, more or less.
![]() Next up: Lesson 4 - Checking your rc airplane weight and balance.
Next up: Lesson 4 - Checking your rc airplane weight and balance.
Or skip to the lesson appropriate to your current situation...
- Lesson 1: Buying your rc airplane
- Lesson 2: Know your rc airplane
- Lesson 4: Weight and balance
- Lesson 5: Where to fly your plane
- Lesson 6: Pre-flight checks
- Lesson 7: Take off / hand launch
- Lesson 8: Flying your rc airplane
- Lesson 9: Landing your rc airplane
