*This website, RC Airplane World, is for sale. Established 20+ years, big potential. Please contact me through my contact page if interested!*
RC Airplane World flight school
- lesson #4 : weight and balance
Following on from lesson 3, this rc flight school page will teach you how to check the weight and balance of your rc airplane.
Getting the weight and balance correct before you fly your plane is so important, especially the balance.
Every airplane, whether model or real, has a Centre of Gravity ('CG' or 'CoG') that is determined in the plane's design stage. This CG is where the plane balances longitudinally (nose-tail) and is crucial to the airplane's flight characteristics. Getting the plane correctly balanced around the CG is an absolute must for safe and stable flying.
Checking the all-up weight (AUW) of the airplane isn't as crucial as the balance, although it's still very important because, generally speaking, all model aircraft need to be kept as light as possible to ensure optimum performance.
If you've bought an ARF or RTF airplane then the weight should more or less come in at what the manufacturer has specified.
Building from a kit potentially allows for greater discrepancies in weight, and care must be taken not to build a plane too heavy. Over-enthusiastic use of glue, or 'heavy' glue such as epoxy, and thicker than necessary covering, and paint, can all add unnecessary weight during the build process, and it all adds up surprisingly quickly!
In the unlikely event that your plane is seriously overweight to what it should be, you need to do something about it because the wing loading is going to be higher than it should be, and this is going to worsen the flight characteristics.
Realistically, your only options when it comes to post-build weight reduction are to use a smaller/lighter battery packs and/or smaller (but still compatible and suitable) servos and receiver, and try and get the weight down that way. There's not a lot you can do to reduce a heavily built airframe.
Checking the balance (CG)
This is the important one, and it's easy enough to do.
The first step is to identify the correct Centre of Gravity location, as stated by the manufacturer. This CG position should be in the manual, and will read something like "75mm (3 inches) back from wing leading edge", for example.
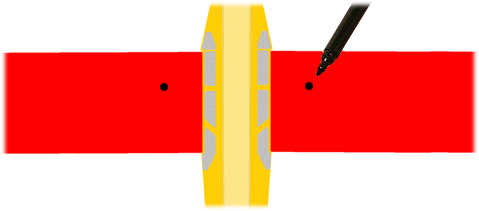
Secondly you need to mark the CG location with a pen (or tape) on the undersides of the wing. You should mark the CG location close to the fuselage, rather than further out down the wing. One or two inches out from the fuselage sides is fine.

Above: mark the CG location on each wing.
Thirdly, and very importantly, you need to get your plane to a 'flight ready' status i.e. have it completed and flight pack installed in the correct place. Don't worry about connecting anything up at this stage though. If you have an IC plane, have the fuel tank empty.
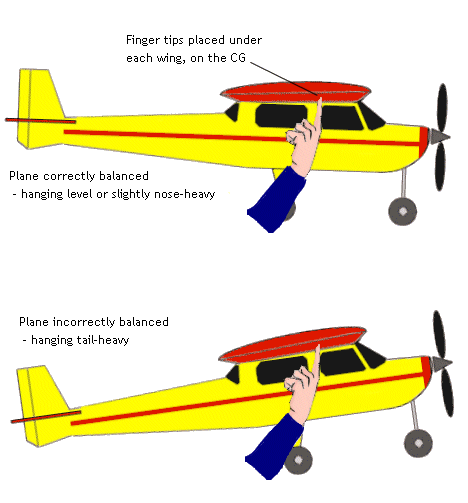
With all this done, slowly lift the plane up with the CG marks on each of your index or middle finger tips....

Above: lifting the plane on its CG to check balance.
The picture above gives you an idea of what should happen when you lift the plane; either the plane will hang more or less horizontally or it will be nose down or tail down.
If it hangs level, then the CG is good and you don't need to do anything. If it hangs slightly nose down, this isn't a problem either; a little nose-heaviness is rarely a bad thing.
If it hangs very nose down, or at all tail down, then you need to adjust the balance to get it to hang level.
Your first option is to try moving the motor battery pack forwards or backwards, depending on which way your airplane is hanging. This is the best thing to do to adjust the CG, because you're not adding dead weight to the plane in the form of ballast.
If you cannot shift the pack because it's too tight a fit in its compartment, then you need to add ballast to either the nose or tail end of the plane. If this is the case, add the weight as far out as you can, this will have the greatest effect with the least amount.
So, if you need to add weight to the front because the plane is tail heavy, look at fixing something to the underside of the nose, as far forward as you can. If you need to add weight to the tail end of the airplane, because it's nose heavy, then try and add it to the very rear of the fuselage - where both sides come together, so to speak.
Whatever weight you add to the nose or tail, make sure it's very secure! Having the weight fly off during a flight will upset the CG and this is going to adversely effect the plane's flight characteristics.
Depending on what you've used for ballast, tape or glue usually does the job of holding it in place. But remember that a lot of glue can add even more weight, so always be careful not to use too much.
Always recheck your airplane's balance once you've finished adding ballast.
It's important to understand that a slightly nose heavy plane will still fly fine. A tail heavy plane, however, is bad news; the plane will be at best very difficult to control, and at worst completely uncontrollable. If your airplane seems tail heavy when it's balancing on your fingertips, do something about it.
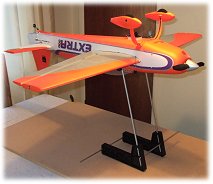
 Incidentally, this 'finger tip' method is a quick and easy method that works well for balancing high wing airplanes. If you don't trust your fingertips, you can buy a CG balancer such as the Great Planes CG Machine which is a great tool if you're serious about the hobby.
Roll (lateral) balancing your RC airplane
This is often overlooked and isn't as critical as getting the CG correct, but a plane that has one side heavier than the other will want to roll and turn to the heavier side, making your life a bit harder.
Lateral imbalance isn't uncommon and is usually caused by one wing being heavier than the other.
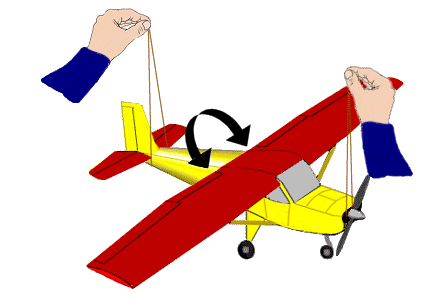
To check your plane's lateral balance, simply loop some thread around the propeller shaft, and then some around the rear of the fuselage as close to the tail as you can get it. If the tail end proves awkward, insert a small pin in to the centerline of the rudder trailing edge, and place the thread around that.
Lift the airplane up and let it hang freely - see if it wants to roll to one side or another. If it does, then you need to add some weight to the wingtip of the lighter (higher) side.
Add only enough weight to make the plane hang level, when viewed from the front. Taping the weights to the wingtip is an easy method, although you might want to take the trouble to set them into the wingtip and cover over them to hide them from view.
For foam wings, pushing a small gauge screw, nail or panel pin into the foam is a great way of adding any necessary weight, and is easily hidden with white paint or marker pen.

Above: use 2 lengths of string around each end of the plane to check the roll balance.
Well hopefully this flight school lesson has taken you through the important steps of getting your rc airplane weight and balance correct.
Do take your time getting your rc airplane weight and balance correct, and you'll be rewarded with easier flying and less trimming (Read more about trimming your rc airplane.)
![]() Next up: Lesson 5 - Finding where to fly your rc airplane.
Next up: Lesson 5 - Finding where to fly your rc airplane.
Or skip to the lesson appropriate to your current situation...
- Lesson 1: Buying your rc airplane.
- Lesson 2: Know your rc airplane.
- Lesson 3: Preparing your plane.
- Lesson 5: Where to fly your plane.
- Lesson 6: Pre-flight checks.
- Lesson 7: Take off / hand launch.
- Lesson 8: Flying your rc airplane.
- Lesson 9: Landing your rc airplane.
