How to balance an RC propeller
Correct RC propeller balance is very important and often overlooked, especially by the beginner flying a shiny new RTF!
Learning how to balance a prop for your rc airplane is a fairly simple process and it's worth taking the time to do it. It's nice to think that all props come out the factory perfectly balanced but that's rarely, if ever, the case.
A perfectly balanced rc propeller will mean less vibration in your plane and this is very beneficial - severe vibration can cause weaknesses and failures over time, not just in the airframe but also the electronic components of the plane. For the short time it takes to correctly balance a prop, the rewards are large!
Admittedly, rc prop balance is more critical in IC powered planes than EP ones, since electric motors run smoother anyway and so there is already less vibration to worry about, but it is good to get in to the habit of balancing your propellers anyway, regardless of power type.
The RC propeller balancing game
The first thing you need to do is buy a good propeller balancing tool; you could make one if you're practically minded but for what they cost a proper tool is the way to go.
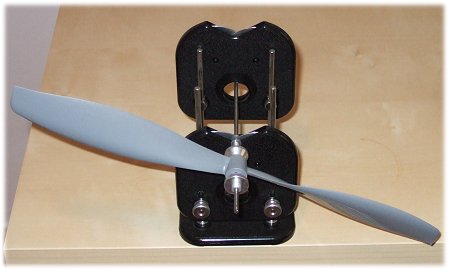
You can buy hand-held tools that consist of nothing more than a spindle and prop-clamping device, but it's worth investing in a better desktop balancer such as the Dubro Tru-Spin Prop Balancer. This is my personal choice and I can give it a big thumbs up for getting the job done well.
The Tru-Spin balancer is not only top notch for propeller balancing but it can also accept spinners and complete helicopter rotor head assemblies, should the need ever arise.
The process for correctly balancing your RC propeller goes thus:
Step 1: Secure the prop to be balanced in the balancing tool (as per the instructions) and stand the tool somewhere where the prop can hang freely. Also, it's important that there is no air movement in the room - even heavy breathing over the prop can give you a false reading.
Let the prop swing freely and let it come to a natural rest. If there is a discrepancy in weight between the blades, the heavier blade will hang lower than the lighter one:

Step 2: once you've determined that there is a difference in weight between each side of the prop, there are two ways you can attack the problem...
 One is to balance the hub of the prop. This method is better for larger props (with bigger hubs) rather than your average park-flyer size propeller with hubs that are really too small to try and balance easily.
Hub balancing is done by carefully drilling very small holes (say 2mm diameter) on the lighter side of the back of the hub, and filling the holes with a liquid ballast material or small pieces of lead, or perhaps fishing shot, sealed in. Obviously the lighter side will be identified when using your prop balancer.
Drill and fill one hole at a time and try the prop on the balancing tool after each time.
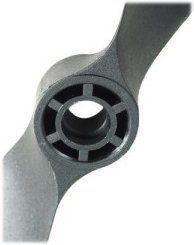
With many props, especially larger diameter ones, it's quite probable that there are already holes in place (i.e. the hub is not solid, see pic.), so you can use these instead of drilling fresh ones. It's very unlikely that you'll need to fill one of these complete holes with ballast, so use only the ballast you need and fill the rest with light balsa or foam - something that carries no noticeable weight.
When you've got it right, seal the ballast in place with the balsa/foam and CA glue. You can use epoxy but this will add more weight, potentially putting the prop out of balance again.
The alternative method, especially on small diameter propellers, is to leave the hub as it is and balance the blades. You can either add weight to the lighter blade, or remove weight from the heavier one.
To add weight to a lighter blade, tape can be added to the back side of the blade. This is a quick fix but you need to be aware that, with time, the tape will likely come off. But I have used this method and it's worked perfectly well at my level of flying!
An alternative is to use paint or varnish on the backside of the blade; add a coat and recheck the propeller balance, and keep adding until it's right. Be sure that you're using a suitable paint though, one meant to be used on the material that the prop is made from.
You can also paint the tips of your prop white or yellow, which gives props a good safety advantage, and add more coats of paint to the lighter tip until it balances correctly.
To remove material from a heavier blade, carefully sand away the backside of the blade, close to the hub - keep your sanding to the inner 1/3 of the blade length, as less strength is lost here. Sanding is really only effective if the imbalance between blades is minimal. If your prop is very out of balance, look at adding weight to the hub or lighter blade first.

Above left: tape has been added to the backside of the lighter blade. Right: sanding the heavier blade is the alternative option.
Step 3: keep rechecking the balance after every alteration, you'll more than likely find that very little weight needs to be added or removed to sort out the imbalance.
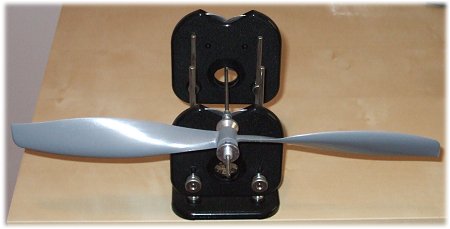
When the propeller balance is correct, the prop will stop rotating on the balancing tool at any position - it won't necessarily rest in the horizontal position. If it stops rotating and then moves back the other way slightly, it's still not balanced correctly.

Above: A correctly balanced prop will come to rest, at any position, without tipping one way or the other. Don't look for just a 3 o'clock - 9 o'clock position, as shown above.
Other things to consider
Before you do balance a propeller, measure the distance from the inside of the hole to the tip of each blade. The distances should be equal.
If there's a discrepancy between the two measurements (if there is, it shouldn't be much), carefully sand back the longer blade until both sides measure the same. Retain the original shape of the tip.
Also, before you put the prop on the balancer, check that the prop is rotating evenly on the motor shaft/prop adapter. If there's a noticeable wobble, it's possible that the hole in the propeller is not perfectly perpendicular to the hub. This could be corrected with very careful reaming of the hole, but personally I recommend trying another prop first.
Finally, make a conscious effort to look for vibration in your airplanes and recheck the balance of your propellers every now and again. Props do make contact with the ground every once in a while, and small pieces can go missing resulting in a new imbalance.
If a prop gets very badly damaged, never try a repair job. Always always replace the prop with a new (and newly balanced) one.
Spinner balancing
If your plane has a spinner, it's a good idea to check the balance of that too. My FMS P-51 Mustang had a very nasty vibration which I assumed was the prop. On balancing the prop the vibration was still there, which really only left the spinner as the culprit. Sure enough, on the inside of the spinner, was a large lump of plastic from the manufacturing process. Once removed, all was good.
To balance the spinner, make sure your propeller is correctly balanced first and then pop the whole prop and spinner assembly on the prop balancing tool. Let it rotate and stop, and then proceed to balance the spinner as outlined above for the prop.
